“Not sure about the route of the Shikoku 88 Temple Pilgrimage…”
“How long does it take to complete all of it?”
Hello, I’m Taka, the creator of this blog.
I have walked the Shikoku Pilgrimage twice, completing both the clockwise and counterclockwise routes.
For both journeys, I traveled in sections and experienced all four seasons—spring, summer, autumn, and winter.
For those with these questions, this article provides a complete overview of all 88 temples, including routes, distances, and travel times.
In addition, you’ll find:
- Common challenges beginners face
- Long and potentially difficult sections
- Tips for completing the pilgrimage efficiently
If you’re wondering:
“Where should I start?”
“I want to follow the most efficient route”
This guide will help you plan your pilgrimage with confidence and avoid common mistakes.
- Basic Information
- Shikoku 88 Temple Pilgrimage: Overall Map
- Tokushima Area: Temple List and Travel Time
- Kochi Area: Temple List and Travel Time
- Ehime Area: Temple List and Travel Time
- Kagawa Area: Temple List and Travel Time
- Frequently Asked Questions (FAQ)
- Summary|Key Points for Planning the Shikoku 88 Temple Pilgrimage Route
- Related Articles
Basic Information
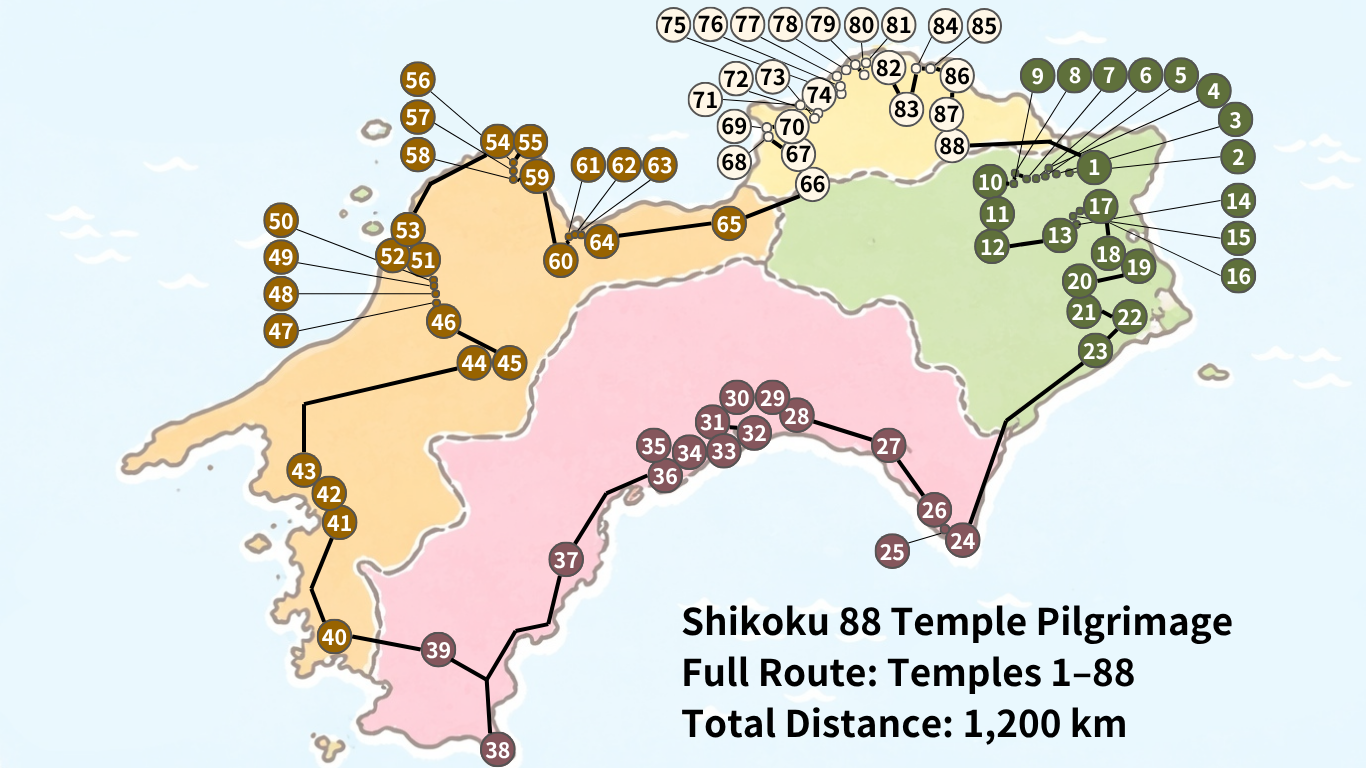
Overview of the Shikoku 88 Temple Pilgrimage:
- Total distance: approximately 1,200 km
- On foot: 40–60 days
- By car: 10–14 days
Shikoku 88 Temple Pilgrimage: Overall Map
Google Map: Shikoku 88 Temple Route
This map shows all 88 temples of the Shikoku Pilgrimage on Google Maps for easy reference.
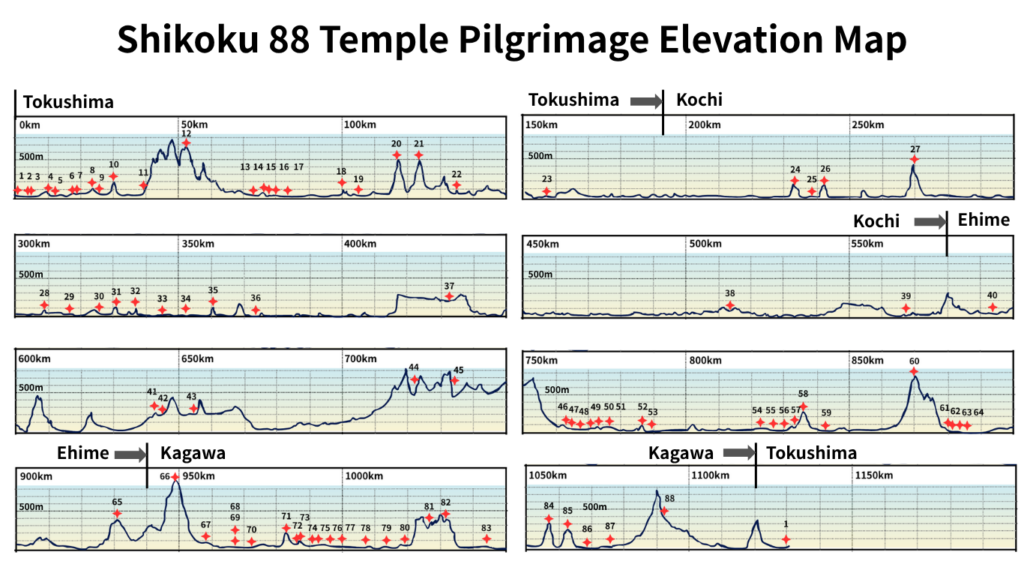
Elevation Map
This map clearly shows the elevation changes (ups and downs) along the Shikoku 88 Temple Pilgrimage route.
- Vertical axis: elevation in 100 m increments
- Horizontal axis: distance in 10 km increments
By viewing this chart, you can quickly identify which sections are more physically demanding.
Tokushima Area: Temple List and Travel Time
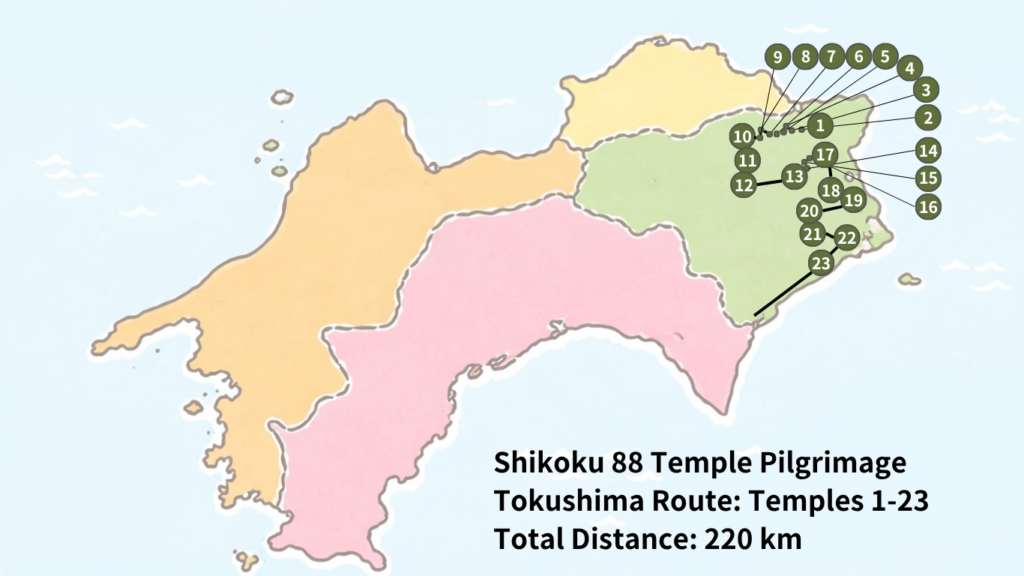
The Tokushima area includes Temples 1–23 of the Shikoku 88 Temple Pilgrimage, with a total distance of approximately 220 km.
Estimated travel time:
- On foot: about 10 days
- By car: about 3 days
This is the starting point of the pilgrimage and is generally considered a beginner-friendly area, but there are still some important points to watch out for.
In particular, the section between Temples 11 and 12 (Shosanji) involves steep mountain paths and is known as one of the most challenging parts. This area is often called “Henro Korogashi” (the pilgrim killer) because it can quickly drain your energy.
Also, the stretch from Temple 23 to Temple 24 is about 75 km, making it a long-distance section that requires proper planning in advance.
If you plan to camp or stay outdoors, it’s a good idea to stock up on food around the Sakihama area. There are few convenience stores or supply points along this route, so traveling without preparation may lead to shortages.
By understanding distances and supply points beforehand, you can plan a safer and more efficient pilgrimage.
Temples 1–23: Tokushima Temple List
| Temple (Google Maps) | To Next Temple | By Car | On Foot | Train & Bus Route Guide | Lodging |
|---|---|---|---|---|---|
| Temple 1: Ryozenji (MAP) | 1.4 km | 5 min | 20 min | None | |
| Temple 2: Gokurakuji (MAP) | 2.6 km | 10 min | 40 min | None | |
| Temple 3: Konsenji (MAP) | 5 km | 15 min | 1 hr 30 min | None | |
| Temple 4: Dainichiji (MAP) | 2 km | 10 min | 30 min | None | |
| Temple 5: Jizoji (MAP) | 5.3 km | 15 min | 1 hr 30 min | None | |
| Temple 6: Anrakuji (MAP) | 1.2 km | 5 min | 20 min | Available | |
| Temple 7: Jurakuji (MAP) | 4.2 km | 10 min | 1 hr 10 min | Available | |
| Temple 8: Kumadaniji (MAP) | 2.4 km | 10 min | 40 min | None | |
| Temple 9: Horinji (MAP) | 3.8 km | 15 min | 1 hr 10 min | None | |
| Temple 10: Kirihataji (MAP) | 9.3 km | 35 min | 2 hr 40 min | None | |
| Temple 11: Fujiidera (MAP) | 12.9 km | 1 hr 30 min | 7 hr | None | |
| Temple 12: Shosanji (MAP) | 20.8 km | 1 hr | 6 hr | Available | |
| Temple 13: Dainichiji (MAP) | 2.3 km | 10 min | 40 min | Available | |
| Temple 14: Jorakuji (MAP) | 0.8 km | 5 min | 10 min | None | |
| Temple 15: Kokubunji (MAP) | 1.8 km | 10 min | 30 min | None | |
| Temple 16: Kannonji (MAP) | 2.8 km | 20 min | 50 min | None | |
| Temple 17: Idoji (MAP) | 16.8 km | 1 hr | 5 hr | None | |
| Temple 18: Onzanji (MAP) | 4 km | 15 min | 1 hr 10 min | None | |
| Temple 19: Tatsueji (MAP) | 13.1 km | 30 min | 4 hr 30 min | Available | |
| Temple 20: Kakurinji (MAP) | 6.7 km | 20 min | 3 hr | None | |
| Temple 21: Tairyuji (MAP) | 10.9 km | 25 min | 4 hr | None | |
| Temple 22: Byodoji (MAP) | 19.7 km | 30 min | 6 hr 20 min | Train Route | Available |
| Temple 23: Yakuoji (MAP) | 75.4 km | 2 hr | 22 hr | Train & Bus Route | Available |
On my way to Temple 20, Kakurinji, I encountered heavy rain and experienced an extremely harsh pilgrimage route.
The mountain path quickly turned muddy, making the footing very slippery and significantly increasing the level of danger compared to normal conditions. Visibility also worsened, creating a harsh situation that was both physically and mentally exhausting.
By checking the weather forecast in advance and adjusting your plans flexibly, you can continue your pilgrimage more safely.
I have written a separate article detailing my experience of camping in heavy rain at Temple 20, Kakurinji.
Day 5 Shikoku Pilgrimage: Kakurinji in Heavy Rain
Kochi Area: Temple List and Travel Time
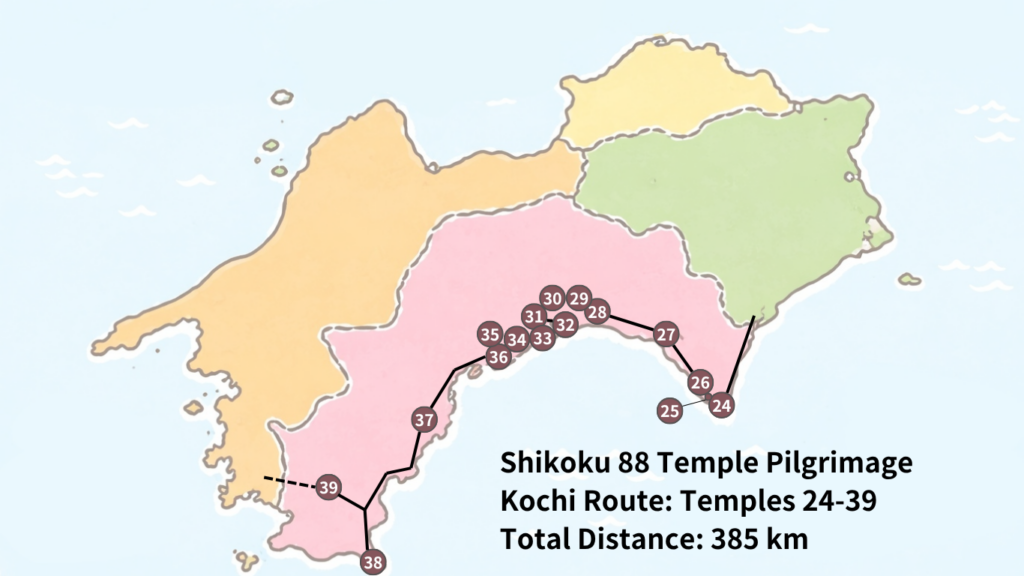
The Kochi area includes Temples 24–39 of the Shikoku 88 Temple Pilgrimage, covering a total distance of approximately 385 km. It is one of the longest and most demanding sections of the entire pilgrimage.
Estimated travel time:
- On foot: about 10–15 days
- By car: about 3 days
A key characteristic of the Kochi route is the long distance between temples.
Pay special attention to:
- Around Temple 24 (Hotsumisakiji) – Cape Muroto
- Around Temple 38 (Kongofukuji) – Cape Ashizuri
In these areas, the distance to the next temple can exceed 70 km, making careful planning for supplies and accommodation essential.
On the other hand, Temples 28–36 are relatively concentrated around Kochi City, making this section easier to travel. It’s a good opportunity to adjust your pace and recover.
The Kochi route highlights an important point: longer distances require better planning. By understanding travel distances and supply points in advance, you can complete your pilgrimage more safely and efficiently.
Temples 24–39: Kochi Temple List
| Temple (Google Maps) | To Next Temple | By Car | On Foot | Train & Bus Route Guide | Lodging |
|---|---|---|---|---|---|
| Temple 24: Hotsumisakiji (MAP) | 6.5 km | 15 min | 1 hr 50 min | Bus Route | Available |
| Temple 25: Shinshoji (MAP) | 3.8 km | 15 min | 1 hr 20 min | Bus Route | None |
| Temple 26: Kongochōji (MAP) | 27.5 km | 1 hr 30 min | 8 hr 30 min | Bus Route | Available |
| Temple 27: Konomineji (MAP) | 37.5 km | 1 hr | 11 hr | Train Route | None |
| Temple 28: Dainichiji (MAP) | 7.5 km | 20 min | 2 hr 20 min | Train Route | None |
| Temple 29: Kokubunji (MAP) | 6.9 km | 30 min | 2 hr | None | |
| Temple 30: Zenrakuji (MAP) | 6.6 km | 30 min | 2 hr | None | |
| Temple 31: Chikurinji (MAP) | 5.7 km | 20 min | 1 hr 30 min | None | |
| Temple 32: Zenjibuji (MAP) | 7.5 km | 30 min | 2 hr 20 min | None | |
| Temple 33: Sekkeiji (MAP) | 6.3 km | 20 min | 1 hr 40 min | Available | |
| Temple 34: Tanemaji (MAP) | 9.8 km | 40 min | 3 hr | None | |
| Temple 35: Kiyotakiji (MAP) | 13.9 km | 50 min | 4 hr | None | |
| Temple 36: Shoryuji (MAP) | 58.5 km | 1 hr 30 min | 17 hr | None | |
| Temple 37: Iwamotoji (MAP) | 80.7 km | 2 hr | 24 hr | Train & Bus Route | Available |
| Temple 38: Kongofukuji (MAP) | 52.8 km | 1 hr 30 min | 15 hr 30 min | Train & Bus Route | Available |
| Temple 39: Enkoji (MAP) | 25.8 km | 40 min | 8 hr 30 min | None |
I walked the Kochi section of the pilgrimage in summer.
Kochi features many coastal routes with little shade, exposing you to strong, direct sunlight for long stretches, making it a physically demanding area.
Despite the harsh conditions, the scenery—surrounded by the blue sea and sky—is stunning, and it’s a route where you can truly experience the openness and beauty unique to summer.
Ehime Area: Temple List and Travel Time
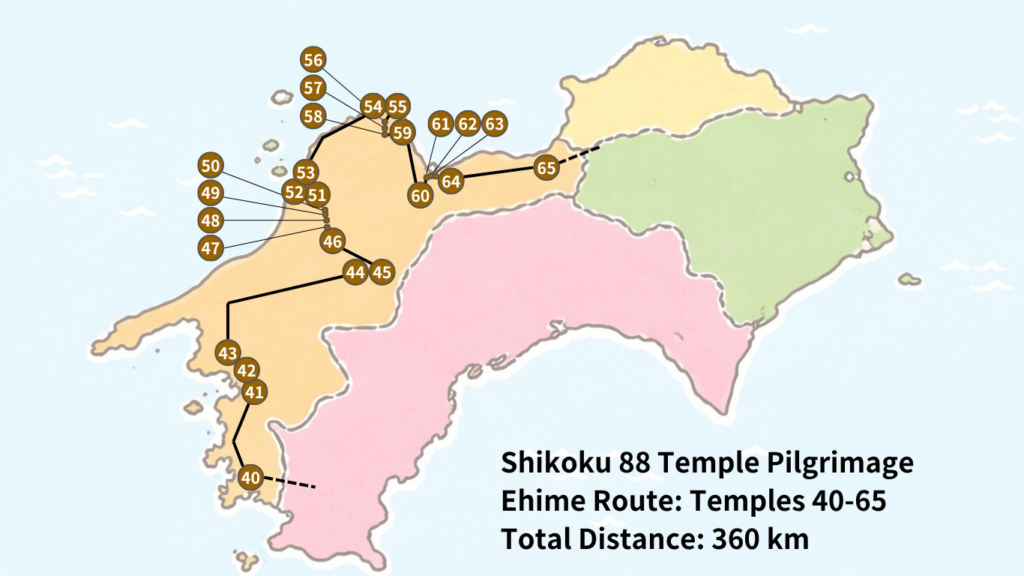
The Ehime area includes Temples 40–65 of the Shikoku 88 Temple Pilgrimage, covering a total distance of approximately 360 km. This section features long distances combined with significant elevation changes.
Estimated travel time:
- On foot: about 10–15 days
- By car: about 3 days
A key characteristic of the Ehime route is not only the distance but also the steep elevation gains and losses.
Pay special attention to:
- Temple 44 (Daihōji)
- Temple 60 (Yokomineji)
These temples are located in mountainous areas over 700 meters above sea level and are considered some of the most challenging sections of the pilgrimage. Long, steep climbs can quickly drain your energy.
Because of this, it’s important to plan a realistic schedule and ensure you take enough breaks and carry sufficient supplies.
The Ehime route tests your endurance with both distance and elevation. By understanding the terrain and route in advance, you can plan a safer and more efficient pilgrimage.
Temples 40–65: Ehime Temple List
| Temple (Google Maps) | To Next Temple | By Car | On Foot | Lodging |
|---|---|---|---|---|
| Temple 40: Kanjizaiji (MAP) | 50.2 km | 1 hr 30 min | 16 hr | Available |
| Temple 41: Ryukoji (MAP) | 2.6 km | 10 min | 50 min | None |
| Temple 42: Butsumokuji (MAP) | 10.6 km | 30 min | 3 hr 40 min | None |
| Temple 43: Meisekiji (MAP) | 67.2 km | 2 hr | 20 hr | None |
| Temple 44: Daihoji (MAP) | 8.4 km | 20 min | 4 hr | Available |
| Temple 45: Iwayaji (MAP) | 29 km | 1 hr | 9 hr 40 min | None |
| Temple 46: Joruriji (MAP) | 0.9 km | 5 min | 15 min | None |
| Temple 47: Yasakaji (MAP) | 4.4 km | 10 min | 1 hr 20 min | None |
| Temple 48: Sairinji (MAP) | 3.1 km | 10 min | 50 min | None |
| Temple 49: Jodoji (MAP) | 1.7 km | 5 min | 30 min | None |
| Temple 50: Hantaji (MAP) | 2.8 km | 5 min | 45 min | None |
| Temple 51: Ishiteji (MAP) | 10.7 km | 30 min | 3 hr | None |
| Temple 52: Taisanji (MAP) | 2.6 km | 10 min | 45 min | None |
| Temple 53: Enmyoji (MAP) | 34.4 km | 1 hr | 10 hr | None |
| Temple 54: Enmeiji (MAP) | 3.4 km | 15 min | 1 hr | None |
| Temple 55: Nankobo (MAP) | 3 km | 15 min | 50 min | None |
| Temple 56: Taisanji (MAP) | 3.1 km | 10 min | 50 min | None |
| Temple 57: Eifukuji (MAP) | 2.4 km | 20 min | 40 min | None |
| Temple 58: Senyuji (MAP) | 6.1 km | 30 min | 1 hr 45 min | Available |
| Temple 59: Kokubunji (MAP) | 27 km | 1 hr 30 min | 10 hr | None |
| Temple 60: Yokomineji (MAP) | 9.6 km | 35 min | 3 hr | None |
| Temple 61: Koenji (MAP) | 1.3 km | 5 min | 20 min | None |
| Temple 62: Hojyuji (MAP) | 1.4 km | 5 min | 20 min | None |
| Temple 63: Kichijoji (MAP) | 3.2 km | 10 min | 50 min | None |
| Temple 64: Maegamiji (MAP) | 45.2 km | 1 hr | 13 hr | None |
| Temple 65: Sankakuji (MAP) | 18.1 km | 30 min | 7 hr | None |
I walked the Ehime section of the pilgrimage in winter.
At Temple 60, Yokomineji, I found myself worshipping in the snow, facing conditions that were far harsher than I had expected.
At the same time, praying in the quiet, snow-covered mountains was a rare and deeply memorable experience—something you wouldn’t normally encounter.
Kagawa Area: Temple List and Travel Time
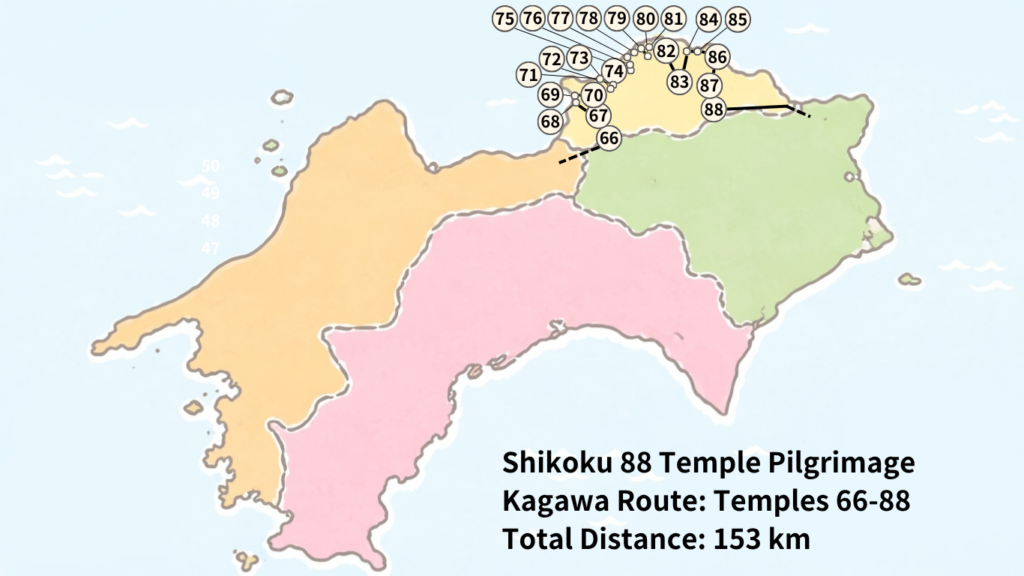
The Kagawa area includes Temples 66–88 of the Shikoku 88 Temple Pilgrimage, with a total distance of approximately 153 km, making it the most compact section among the four prefectures.
Estimated travel time:
- On foot: about 10 days
- By car: about 3 days
A key feature of the Kagawa route is the short distance between temples, making it relatively easy to travel. However, there are also important points to keep in mind.
Because temples are close to each other, it’s easy to spend more time at each stop and cover less distance than expected. To move efficiently, it’s important to balance time spent on worship with travel time.
One of the highlights is Temple 75 (Zentsuji), known as the birthplace of Kobo Daishi (Kukai). As it offers many points of interest, it’s worth allowing extra time for a thorough visit.
As you approach the end of the pilgrimage, you will need to decide whether to:
- Finish at Temple 88
- Return to Temple 1 for an “okaeri-mairi” (final thanksgiving visit)
This choice can significantly affect your schedule.
In particular, if you plan to return to Temple 1, you will need to cross Osaka Pass at an elevation of around 400 meters, so careful planning and energy management are essential.
The Kagawa route may be shorter in distance, but time management becomes especially important. Stay focused and plan carefully until the very end.
Temples 66–88: Kagawa Temple List (Distance & Travel Time)
| Temple (Google Maps) | To Next Temple | By Car | On Foot | Lodging |
|---|---|---|---|---|
| Temple 66: Unpenji (MAP) | 9.4 km | 50 min | 3 hr | None |
| Temple 67: Daikōji (MAP) | 8.7 km | 20 min | 2 hr 30 min | None |
| Temple 68: Jinnein (MAP) | 0 km | 0 min | 0 min | None |
| Temple 69: Kannonji (MAP) | 4.5 km | 10 min | 1 hr 10 min | None |
| Temple 70: Motoyamaji (MAP) | 11.3 km | 30 min | 3 hr 20 min | None |
| Temple 71: Iyadaniji (MAP) | 3.7 km | 10 min | 1 hr | None |
| Temple 72: Mandaraji (MAP) | 0.6 km | 1 min | 10 min | None |
| Temple 73: Shusshakaji (MAP) | 2.2 km | 5 min | 40 min | None |
| Temple 74: Kōyama-ji (MAP) | 1.6 km | 5 min | 30 min | None |
| Temple 75: Zentsuji (MAP) | 3.8 km | 10 min | 1 hr | Available |
| Temple 76: Konkōji (MAP) | 3.9 km | 10 min | 1 hr | None |
| Temple 77: Dōryūji (MAP) | 7.2 km | 15 min | 2 hr | None |
| Temple 78: Gōshōji (MAP) | 5.9 km | 15 min | 1 hr 40 min | None |
| Temple 79: Tennōji (MAP) | 6.6 km | 15 min | 2 hr | None |
| Temple 80: Kokubunji (MAP) | 6.5 km | 30 min | 2 hr | None |
| Temple 81: Shiromineji (MAP) | 5 km | 15 min | 1 hr 40 min | Available (confirmation required) |
| Temple 82: Negoroji (MAP) | 11.9 km | 30 min | 3 hr 30 min | None |
| Temple 83: Ichinomiyaji (MAP) | 13.6 km | 40 min | 4 hr 30 min | None |
| Temple 84: Yashimaji (MAP) | 5.4 km | 15 min | 2 hr | None |
| Temple 85: Yakuriji (MAP) | 6.5 km | 15 min | 2 hr | None |
| Temple 86: Shidoji (MAP) | 7 km | 15 min | 2 hr | None |
| Temple 87: Nagaoji (MAP) | 15.1 km | 40 min | 4 hr 30 min | None |
| Temple 88: Okuboji (MAP) | 38.8 km | 45 min | 12 hr | None |
(Return to Temple 1: Ryozenji, if completing the pilgrimage with an additional visit.)
I personally stayed at the temple lodging (shukubo) at Temple 75, Zentsuji.
It offers a comfortable stay with hot spring baths and private rooms, making it an ideal place to fully recover from the fatigue of walking the pilgrimage.
In the morning service, you can also listen directly to a talk by the head priest, which provides a unique and valuable experience that is special to the pilgrimage.
If you have the time, it’s definitely worth experiencing at least once.
Frequently Asked Questions (FAQ)
- QWhich sections are the most difficult on the walking pilgrimage?
- A
The most challenging sections of the walking pilgrimage—often called “Henro Korogashi” (pilgrim killers)—include the following:
- Temples 11–12 (Shosanji)
A well-known mountain section with steep climbs and significant elevation gain, making it physically demanding. - Temples 20–21
A route with frequent ups and downs that feels tougher than the actual distance suggests. - Temples 23–24
A long stretch of about 75 km with few supply points, requiring careful planning. - Temples 40–44 (Ehime, mountainous area)
Significant elevation changes, especially around Temple 44 (Daihōji), where the climb is particularly strenuous. - Temple 60 (Yokomineji)
A mountain temple over 700 meters above sea level—one of the toughest physical challenges of the pilgrimage.
These sections combine long distances, steep elevation, and limited access to supplies, making preparation essential.
To get through them safely:
- Start early
- Take regular breaks
- Carry enough water and food
Understanding these difficult sections in advance is key to completing a safe and successful walking pilgrimage.
- Temples 11–12 (Shosanji)
- QWhich temples offer lodging (shukubo)?
- A
Please refer to the list above.
- QHow long does it take to complete the Shikoku 88 Temple Pilgrimage?
- A
It depends on how you travel, but here are general estimates:
- On foot: about 40–60 days
- By car: about 10–14 days
For walking pilgrims, the total duration varies depending on your daily distance (typically 20–30 km) and rest days.
By car, the pilgrimage can be completed in a much shorter time due to greater efficiency.It’s important to plan a schedule that matches your physical ability and available time.
- QHow much does it cost to complete the pilgrimage?
- A
The cost varies depending on how you travel, but here are general estimates:
■ Walking pilgrimage
- Cost: approximately ¥300,000–¥500,000
Accommodation and food make up most of the expenses, and the longer the journey, the higher the cost.
■ By car
- Cost: approximately ¥100,000–¥150,000
Main expenses include fuel, tolls, and accommodation.
If you collect goshuin (temple stamps), additional costs will apply:
- Stamp fee: ¥500 × 88 temples = approximately ¥44,000
- Goshuin book: around ¥2,000
- Total: approximately ¥46,000
- Cost: approximately ¥300,000–¥500,000
- QWhat is the total elevation gain of the pilgrimage?
- A
Based on my calculations, the total elevation gain is approximately 16,000 meters.
Walking pilgrimage routes tend to follow the most direct paths, often going straight up and down rather than taking gradual detours like roads. This makes the elevation changes more intense.
A total elevation gain of 16,000 meters is roughly equivalent to climbing Mount Fuji (3,776 m) about four times.
- QI’m worried about getting lost.
- A
The pilgrimage route is generally well-marked with guide signs (michishirube), so it is relatively easy to follow.
However, in mountain areas or sections with many forks, it’s still possible to lose your way, so you should stay alert.
If you do get lost, you can use the map links in this article to check your current location.
Also, since some mountain areas have limited or no signal, it’s a good idea to prepare in advance:
- Download offline maps
- Review the route beforehand
- Carry a paper map
With proper preparation, you can greatly reduce the risk of getting lost.
Summary|Key Points for Planning the Shikoku 88 Temple Pilgrimage Route
- The total distance is long, at approximately 1,200 km
- Difficulty increases significantly from Tokushima to Kochi
- Kochi is challenging due to long distances, while Ehime has tough elevation changes
- Kagawa is shorter but requires careful time management
By understanding the route, distances, and supply points in advance, you can complete the pilgrimage safely and without unnecessary strain.
Use the lists in this article to plan a pilgrimage that suits your pace and style.
Related Articles
A detailed guide to accommodation options on the Shikoku Pilgrimage, including costs and how to choose the right place to stay.
Shikoku Pilgrimage Accommodation Guide
I have compiled a detailed guide to the Shikoku Pilgrimage for beginners.
What is the Shikoku Pilgrimage? Beginner’s Guide to Your First Sacred Journey in Japan
If you would like to learn how to worship at a Japanese temple, please see this page.
How to Worship at Japanese Temples : Shikoku Pilgrimage Guide
This article summarizes things you should not do on the Shikoku Pilgrimage.
Shikoku Pilgrimage Rules & Prohibited Actions: Essential Etiquette for Beginners
Shikoku Pilgrimage Convenience Store Map: Longest Supply Gaps for Walking Henro (2026 Guide).
Convenience Store Guide Map for Shikoku Pilgrims
Comments